The easier it is to book the less likely customers will turn to your competitors. Having a booking form that asks the least information possible is one way to make the registration process easy and intuitive. Registration forms in CourseSales.com can hide sections in a form based on selections the customer has made. For example if your customer is paying for the course themselves you don’t need invoice details.
Tips
When a field is a subform selecting ‘New using box with heading’ and adding a heading will not display it. In this case the information comes from the sub form, and the Field on the Form which brings the Sub Form in is replaced by the sub form. Additionally the text I add in the ‘form text’ area does not get displayed, for the same reason.
Same as above for fields
If you set up a form to have a field eg. a checkbox, that says Same details as above, you can use that field as an indicator on the form field Default If. By setting the form field Default To as an existing field on the form that original field will then use that value i the Default To field. You can use this by collecting Invoice details, and the check box can indicate that a postal address already entered the same.
This is an email only feature. The way it works is only the fields which are filled in are stored, but when an email is being processed the values of one or more fields are temporarily inserted in other fields. This only happens when emails are being processed, and the result is never saved to the database.
Step 1a: create a ‘Postal address same as above’ field:
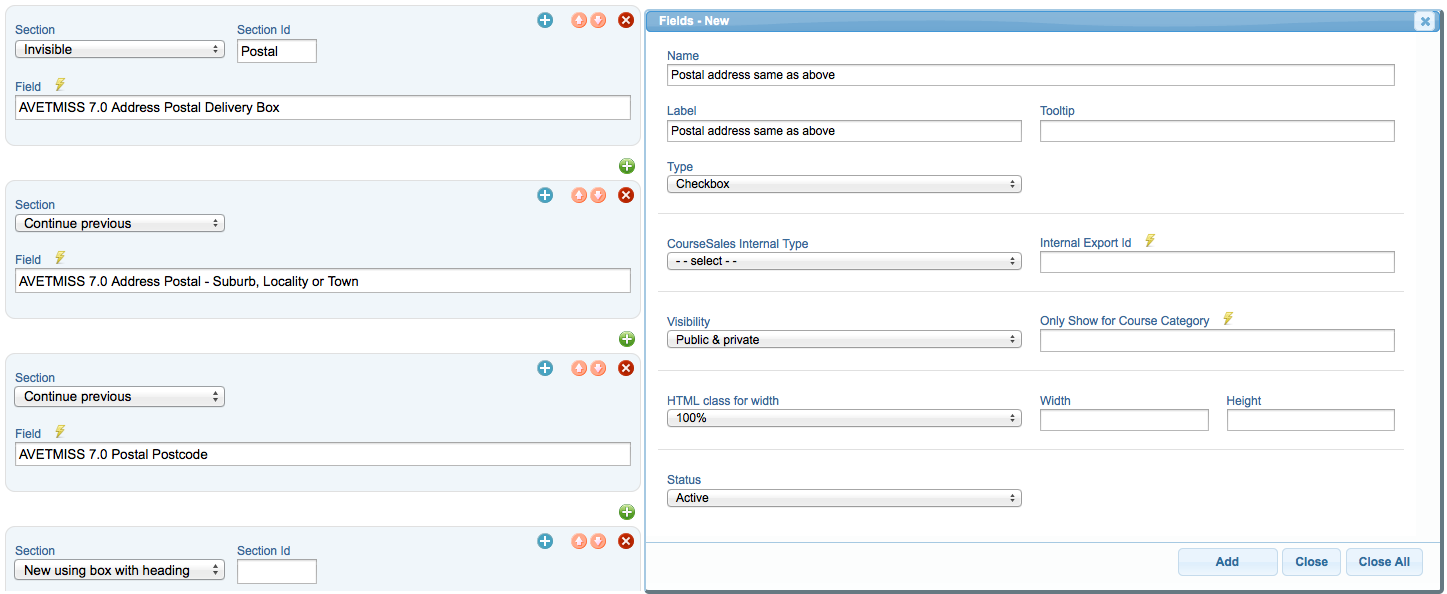
Step 1b: Then configure the ‘Postal address same as above’ field:
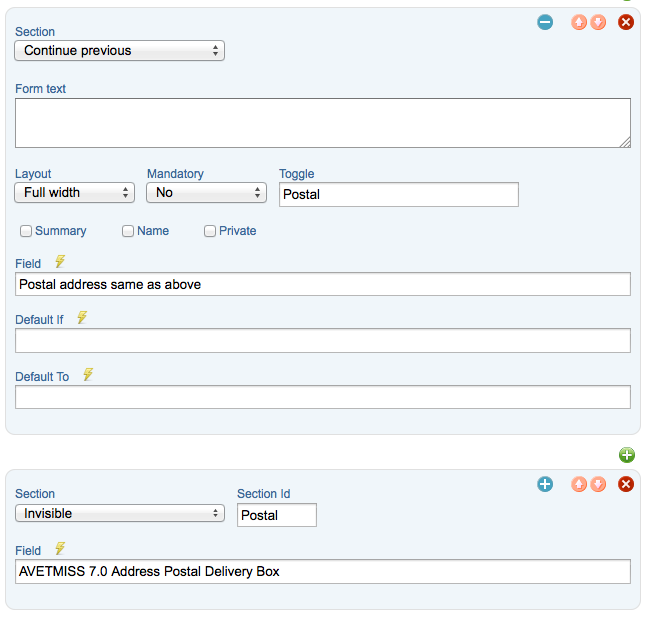
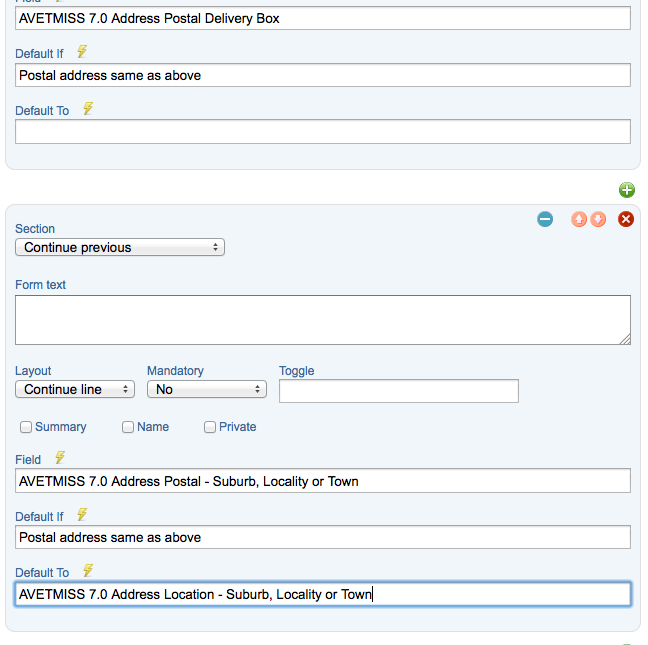
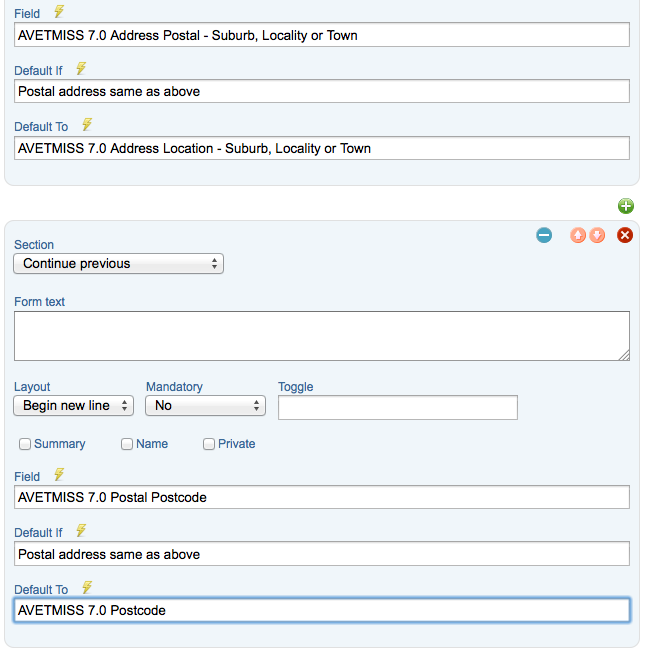
Step 2: Some fields may not have duplicates, such as the postbox. You need to set the Default If (to hide the value) but not the Default To. Note that this field starts the invisible section to hide called ‘Postal’. This corresponds to the ‘Postal’ Toggle on the field ‘Postal address as above’.
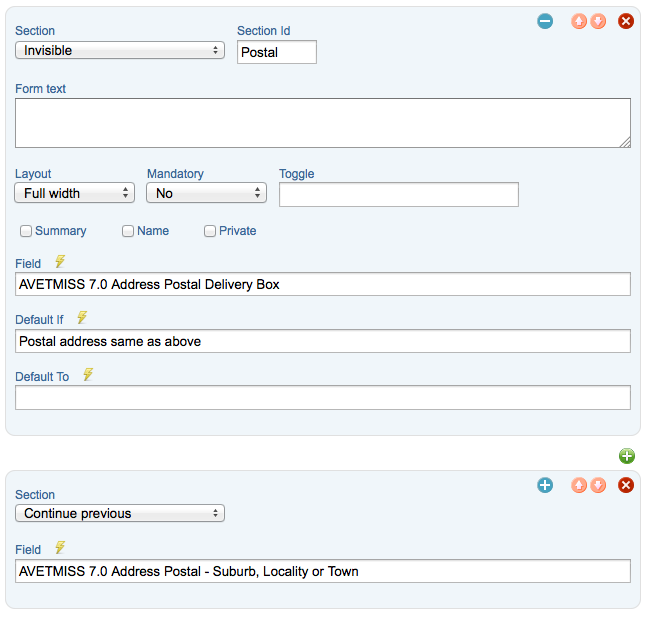
Step 3: Complete the additional fields, the corresponding Default If and the corresponding Default to.
Step 4: the last field needs to be completed, after this field the subsequent fields must have a new section (otherwise those fields will be included in this section and also be hidden, if you still want those fields to be included in the section box then you must start another invisible section.
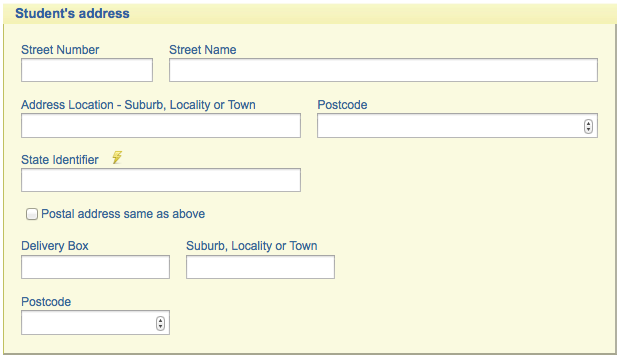
Here is the published form without the checkbox, this is the default display:
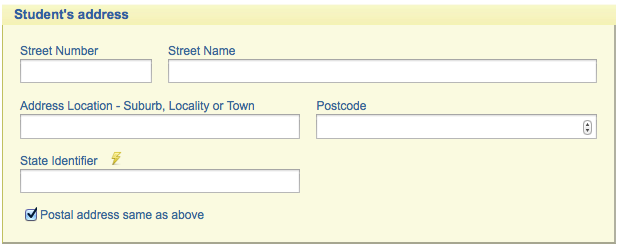
Here is the published form with the checkbox select, and the invisible section hidden:
Creating defaults for fields
Fields can have default values, if they use a predefined value such as autocomplete, radio or checkbox.
Keep in mind when using defaults on a document form: these forms are created in advance of them being used. The logic of defaults is that they only appear on new records the first time they are added by a user. When you go to update the form data the Document Topics record already exist, so fields are not defaulted. This rule exists so that blank fields are not silently overwritten by defaults.
Using pages on forms
With the pages functions in forms (use the ‘New page’ or ‘New page using box with heading’) you can split your forms into multiple page offerings. This means that you can move a complex form into bite size chunks, one page at a time. Next and Prev buttons will appear above and below the form/section that you designate as a new page. You can include a ‘header’ set of fields by not including one or more fields in the page section. You can also include a footer by not including fields below (specifying a new section after the page). You can also designate a Section Id to a page, allowing it to be hidden as required during the progress of completing the form. The use of Section Id and Toggle on a checkbox makes it possible to skip pages where a toggle field has hidden the page.
When hiding forms:
-
If the page is visible the closest adjacent page is show - the next page if there is one, the previous otherwise
-
Buttons on any visible page are rechecked - if there is no longer a prev or next page the corresponding buttons are hidden
Making some fields mandatory
When data is required to be gathered to deliver essential services or to meet government reporting requirements it may be necessary to make these fields mandatory. CourseSales.com sets the mandatory nature at the form (not the field) and offers different levels of mandatory fields, namely:
-
Not mandatory
-
Public Only (Mandatory only when edited via extranet, portals, kiosk, public display of courses)
-
Draft and Submit
-
Submit
-
-
Private Only (Mandatory only when edited inside CourseSales.com)
-
Draft and Submit
-
Submit
-
-
Public and Private (Always Mandatory)
-
Draft and Submit
-
Submit
-
How are the different ways to use CourseSales.com treated - public or private?
-
Admin Portal: treated as private
-
Public: treated as public
-
Kiosk: treated as public
-
Student Portal: treated as public
-
Extranet: treated as public
Some examples of where the different mandatory settings might be useful:
-
Password for access to student portal: Public Only Mandatory. This means that the administrator does not have to enter the password each time, just the student when adding the form (when offering to edit a form either hide the password field or to ensure anything that is edited meet requirements you may wish to use the validator).
-
Terms and conditions: Public Only Mandatory. This means that only the customer agrees the terms and conditions, not the administrator.
Keep in mind that making fields mandatory and then hiding them means they will no longer be mandatory for that view. This is for obvious reasons: You can’t make a hidden field mandatory, your users would fail to see any alert nor be able to do anything about it!
Modifying public pages
Public pages make integration with your website easy. But the public pages are packed ful of useful buttons and information - some you might not need and other items you probably want to adjust and modify to match your existing website. The two CSS files required to be replaced are in the HTML source of the standard public page.
Removing buttons
Reasons to hide buttons include:
-
Direct links to complete a booking form, eg. to fill in AVETMISS data that has been linked from an email. In this case the ‘Back to list’ and ‘Back’ buttons will not lead to useful information.
-
You may sell only inhouse classes, with no public schedule, this means that no courses will be shown on public pages but you may still use public pages to gather student registration details. In this case the ‘Back to list’ and ‘Back’ buttons will not lead to useful information.
-
You may not wish to manage draft registrations. In this case the ‘save to draft’ button will not be required.
-
During the payment process you may wish to hide ‘add another’ buttons to not distract customers from completing their payment.
To hide buttons you need to modify the standard Cascading Style Sheet (for a tutorial on how to use and work with CSS files visit http://www.w3.org/Style/CSS/ )
To remove the back button:
input[name="btnback"]{
    display:none;
}
To remove the Save Draft button:
input[name="btnSave Draft"]{
    display:none;
}
To remove the Back to list button:
input[name="btnlist"]{
    display:none !important;
}
Once you remove the Save draft button you may wish to center the Save button:
input[name="btnSave"]{
    left: 25% !important;
    margin-right: -75% !important;
}
Once you remove the Back button you may find that there is too much space at the top:
#header.public {
   height: 0px !important;
}
Making the buttons colours that match your website can also ensure consistency for your customers
div.crsBtn {
  background-color: #262355 !important;
}
Removing prices
Some providers may not wish to display a price on their courses. If this is the case the following CSS will remove the price, from all courses:
div.crsPrC {
  visibility: hidden !important;
}
Display of course listing
Many things can be done to the course listing. CourseSales.com lists courses in odd and even rows so that each can be easily distinguished by colour, the following curves the corners as well as colouring them.
div.crsRowEven{
    background-color:#C6DCDC !important;
    -moz-border-radius: 9px;
    border-radius: 9px;
}
div.crsRowOdd{
    background-color:#C6DCDC !important
    -moz-border-radius: 9px;
    border-radius: 9px;
}
The icon that opens the Course description Short content to display Course description Section 1 can be made to look rounded as well (notice you had change the ‘more’ and ‘less’ icons.)
span.crsDscMore {
    width: 20px !important;
    -moz-border-radius: 9px;
    border-radius: 9px;
}

span.crsDscLess {
    width: 20px !important;
    -moz-border-radius: 9px;
    border-radius: 9px;
}
Page numbering
The page numbers at the bottom can also be modified to match your preferred style, here we modify the previous and next icons.
div.pgNumPrv {
  cursor:pointer;
  border: 1px solid #00F;
  color: #00F;
  width: 100px !important;
  margin-right: 12px;
  margin-left: 12px;
  height: 20px;
  background-color: white;
  -moz-border-radius: 5px;
  border-radius: 5px;
}
div.pgNum {
  cursor:pointer;
  border: 1px solid #00F;
  color: #00F;
  width: 30px !important;
  margin-right: 6px;
  margin-left: 6px;
  height: 20px;
  background-color: white;
  moz-border-radius: 5px;
  border-radius: 5px;
}