WordPress is a popular content management system for websites. We can host wordpress websites that integrate with CourseSales.com.
The CourseSales.com Connector plugin enables the inclusion of an organisation’s list of training courses, which link through to a registration form and payment. Advanced features include infinity (never-ending) listing of courses, limiting the display of courses by course category and location.
What can you do with the plugin?
-
Include a summary (compressed) list of courses, with some formatting, including form buttons using the slug [coursesales-course-list-summary]
-
Include a more detailed list of courses, with some formatting, including form buttons using the slug [coursesales-course-list-detail]
-
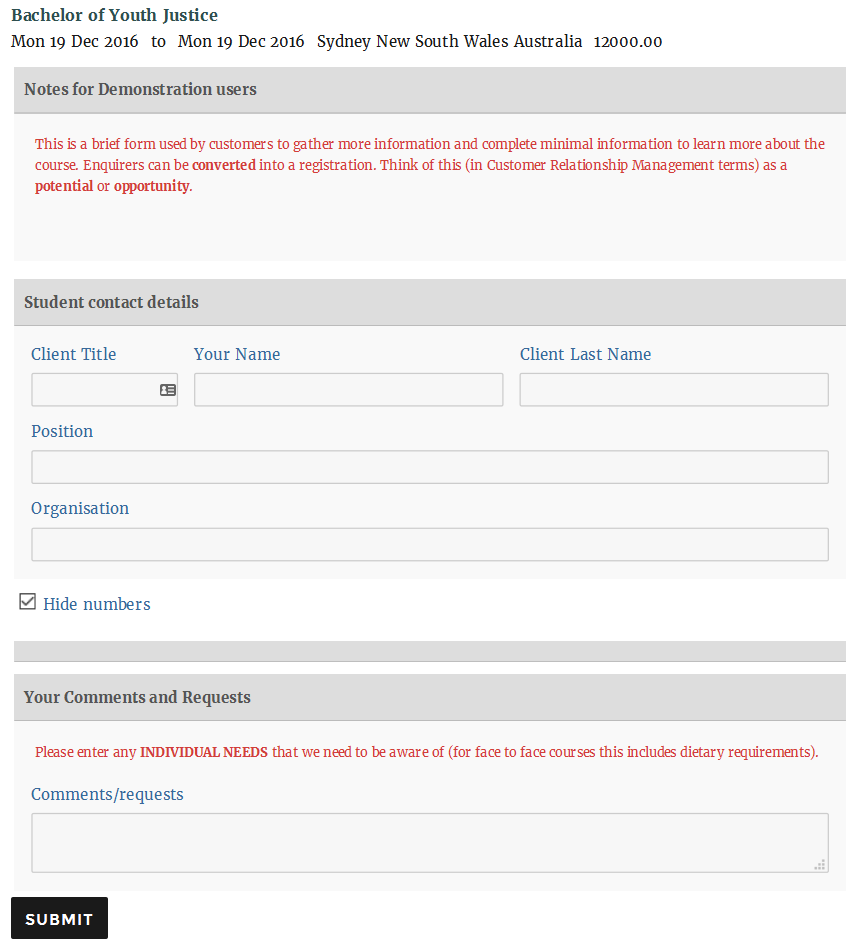
Load a form, see field validation messages from cs, submit the form to cs using the slug [coursesales-form]
-
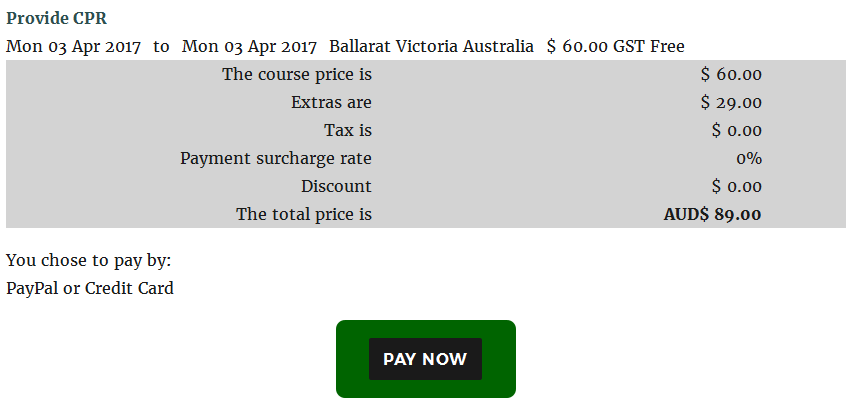
Take payments for registrations using the slug [coursesales-form-success]
-
Display courses for one or one group of locations or course categories
-
Display e-learning course registration forms specific to a course date
-
Sell products along side or in place of courses
-
Sell courses as a ‘shopping cart’ style function, so a customer can buy multiple training courses at once
-
Offer multiple booking discounts to customers
-
Include an agent lookup for those who book with you frequently
-
Provide the plugin to agents who wish to resell your courses via their website - they can specify their agent id so you know where the booking has come from
-
Display the date format that matches your region see here for more details of what code to use to create the format you require
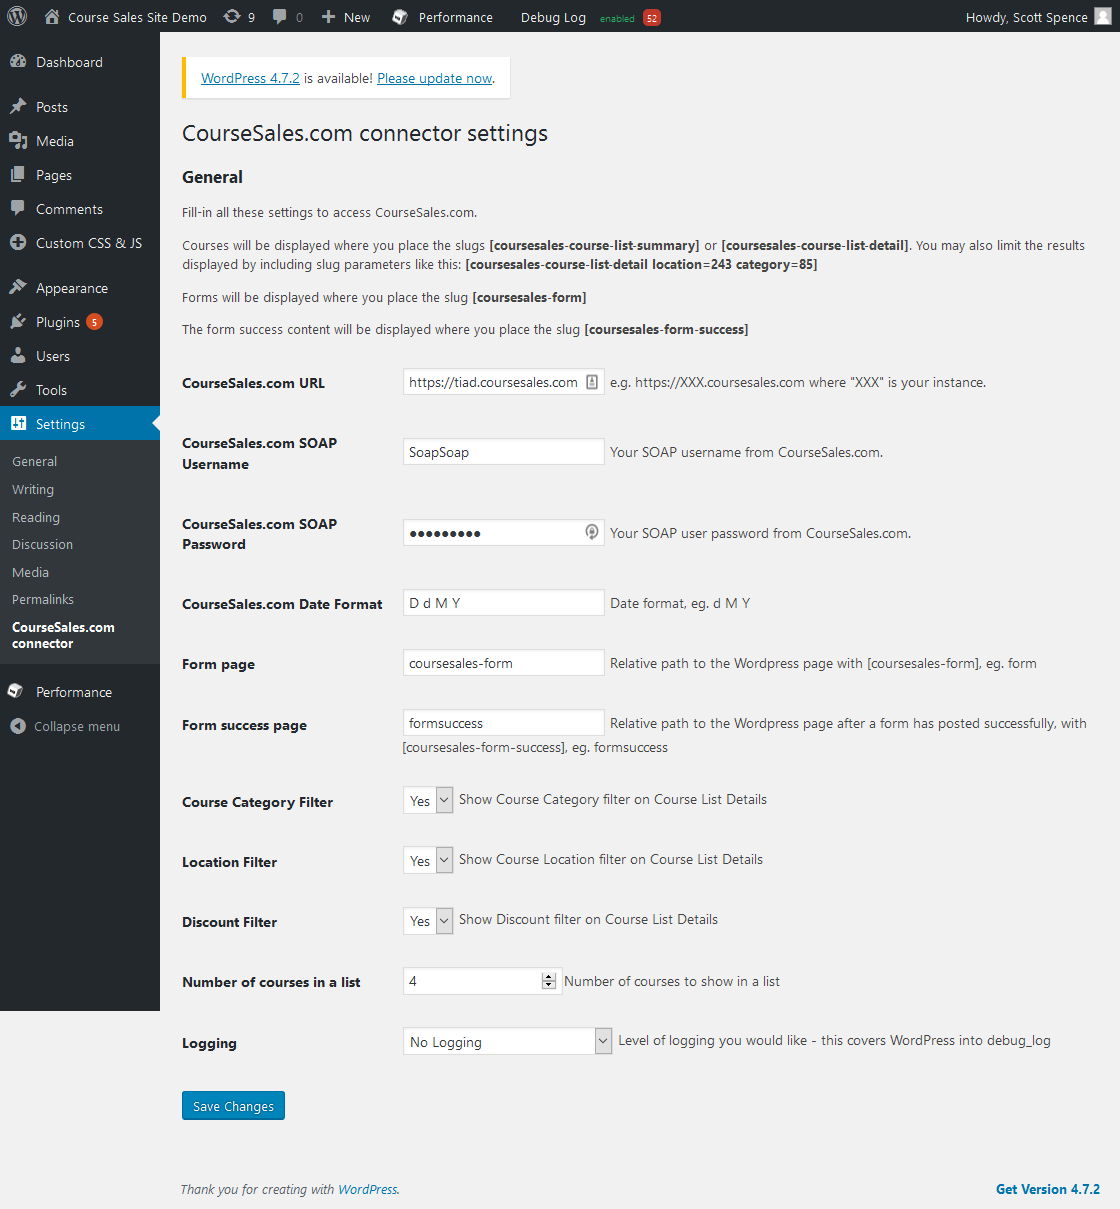
First you need to configure the settings to match coursesales.com and how you wish the forms to appear and search lists to appear.
Requirements to use the Wordpress Plugin
Not surprisingly you must have a CourseSales.com license. To use the cart-based multi-registration features you need to have the reseller license. You also need to use the ‘Post name’ permalink, this also works for you in other ways such as Search Engine Optimisation (SEO). Create the 3 pages you require (list - summary and/or detail, form and form success) and you are ready to go! If you have problems refer to our troubleshooting guide below.
It is also necessary to have an active login configured with the Course Sales Internal Type “Web Service Private', and a valid password.
Configuring the course lists
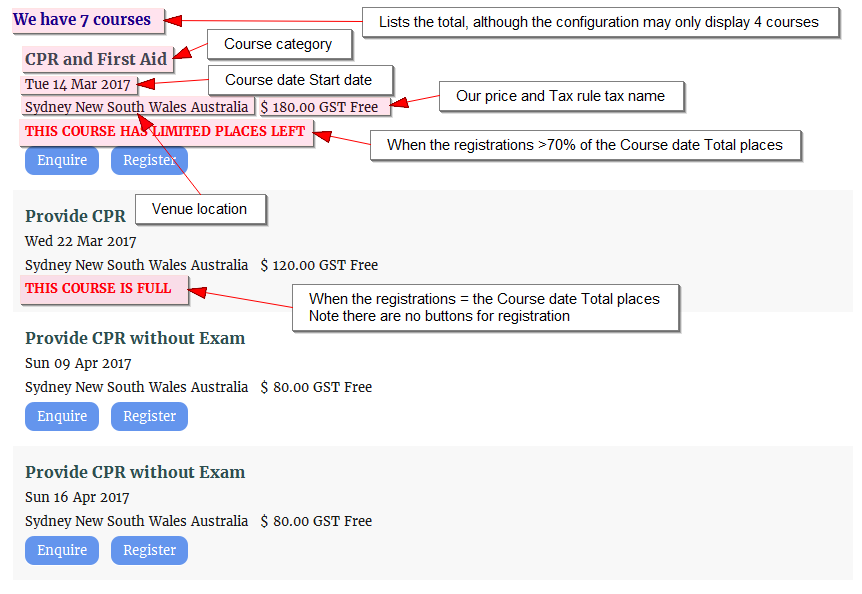
Example of the slug [coursesales-course-list-detail]. This is an ‘endless’ infinity list meaning that as a visitor scrolls to the bottom of the original list (set by the field “Number of courses in a list” in settings) more courses will be displayed, of course if you only have 20 public courses scheduled then only 20 in total will be displayed!

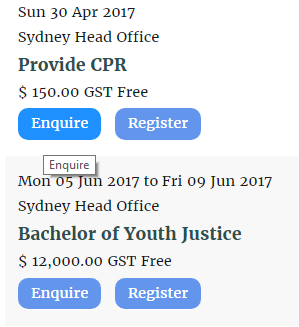
Example of the slug [coursesales-course-list-summary]. This is a fixed list (set by the field “Number of courses in a list” in settings)
Change the content displayed in the lists
Adjusting the values in “Course List Detail View” and “Course List Summary View” it is possible to alter what content you expect to see in each course list, and the order of this content. In each case you can choose from the following: CourseCategory,Dates,Location,Venue,Format,Price,Buttons,Description.
For example using the sequence Dates,Venue,CourseCategory,Price,Buttons displays this:
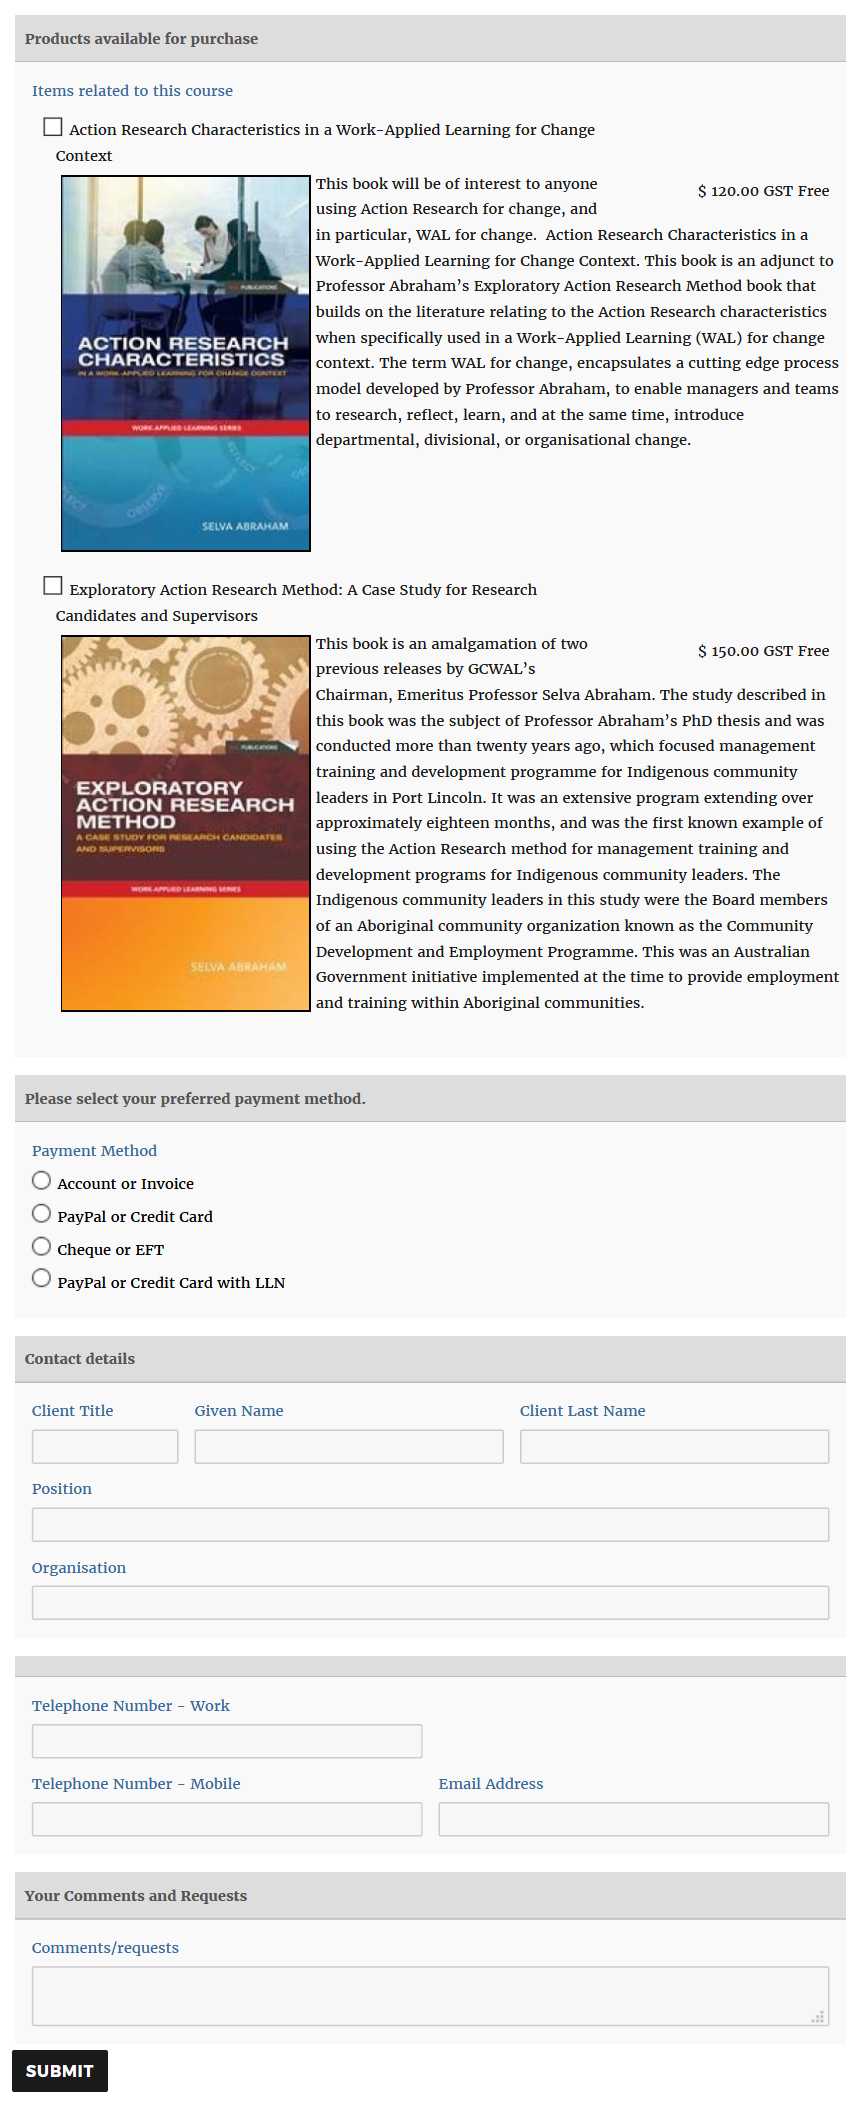
Configuring the Form
The common function is for the plugin to automatically direct students to the correct form, using the page you specify in the ‘Form Page’ Field in the plugin settings. However you can link to specific forms using links or incorporate the details of which course date to display for a form within the slug (see below or examples of this)
Example of the slug [coursesales-form]
Linking directly to a course date’s form or a document’s form-success
If you wish to link to a specific course registration form, public or private you can create these links in the following ways, which will enable you to direct customers to register on a specific course, or use a particular (perhaps non-public) registration form.
Link to the coursesales-form page using the following link construct:
http://tiad.coursesales.net/coursesales-form/?CourseDateId=33038&ProcessStepID=1728
Where CourseDateId=33038 is for the Course Date that you want students to register on
Where ProcessStepID=1728 is the Process Step where you take enrolments
It can be useful to include a link in emails that take a student directly to the payment page. Use the following example to construct this link:
http://tiad.coursesales.net/form-success/?DocumentExternalId=HCUNE31
See Identifiers for Documents, Contacts and Course Dates
Example of the slug [coursesales-form-success]
Using filters within the slugs
It is often useful to have a page about a specific location or specific course category. This can help with SEO and formatting on your website.
Limiting a list to specific course categories or locations
It is possible to limit the courses appearing in a summary list or detailed list slug. This can be useful for when you want to have a list of courses for a specific course, eg you might sell CPR and First Aid courses. To enable the best possible outcome for getting sales and for search engine optimisation (SEO) you may wish to display just your First Aid courses on a page dedicated to First Aid, by including the filter within the slug just the location search filter appears at the top of the detailed list of courses.
Here is an example of how to filter within the slug, you can include both location and category or just one of each:
[coursesales-course-list-detail location=243 category=85]
This uses the OptionId for the location and/or the category.
Working with options and nested (child) options.
While it is not possible to include multiple OptionIds within a slug it is possible to include nested options when using the Location or Course Category Filters, if you select to filter within the slug on the parent option then the child options will appear in the respective search filter. For example: If you have the following Option configuration for a Location:
New South Wales |-Sydney |-Newcastle Queensland (OptionId = 6734) |-Brisbane |-Cairns |-Townsville |-Sunshine Coast Victoria (OptionId = 3452)
If you filter with the slug [coursesales-course-list-detail location=6734] then you will have a list of all courses in Queensland and its child locations, all categories, a category search filter (if configured) and a location filter with just Brisbane, Cairns, Townsville and Sunshine Coast listed. Courses from these child locations and the parent (Queensland) will appear in the search results. Courses for other locations eg Sydney and New South Wales will not appear in the list. When creating child options names do not rely on ‘include in name’ to create the option name for the search filter as the option names included do not include higher level options. eg a child name should be ‘Microsoft Word Advanced’ not ‘Advanced’. If there are no nested options then the option search filter is not displayed eg in the above example using the slug [coursesales-course-list-detail location=3452] to filter by Victoria will result in no location search filter to be displayed.
Embedding a form for a specific course date
If you wish to accumulate all enquiries/enrolments on to just one course date of each category, eg if you deliver e-learning courses and update the course dates just once a year, use the following to link to the enrolment form. You could also use this to gather different types of enquiries or registrations that you might not wish to have on the public course list. For details of this visit “Using filters within the slugs” guidance above.
Link to the coursesales-form page using the following link construct:
[coursesales-form course=33038 step=1728]
Where CourseDateId=33038 is for the Course Date that you want students to register on
Where ProcessStepID=1728 is the Process Step where you take enrolments
Limit the number of courses listed on a per slug basis.
Selling products, not only courses
Using the links that directly take the visitor to a form (see above) you can have pages that use the form slug to
sell products rather than courses. These pages include forms that have the fields arranged to include the catalog list at the top. They are their own course, however these details can be
hidden using CSS. It is also possible to sell courses alongside your training - using the same catalog listing. These products are then included in the invoice sent to the participant and in any online payment method accepted.
Payment methods and Wordpress
The Wordpress plugin by default presents information to customers that is accessible via the public pages ie, https://<shortname>.coursesales.com/public/courses?h=1 and these server most purposes well, however the plugin is able to also manipulate the data to an extent, namely in which fields to display per list record and the payment method text. For example the calculation of price including discounts, tax, surchages, extras etc are formatted by the plugin for all online payment methods. When using a Full HTML Online payment method the HTML within the ‘Online Code’ field of the payment method is displayed fully, however if the payment method is of the type Online pay now link then the link for payment uses the Online code field as the link to direct the customer to a payment provider.
You would, for example, use the Online full HTML payment method when displaying a payment button using a form or javascript. If the payment is just a link then it would use the Online pay now link payment method.
It is still possible to use the payment method to provide a multi-step registration process, eg enabling an exam following registration and/or payment. These steps may require the existing Wordpress display of payment amounts to be hidden using CSS within the payment method field ‘Customer Instructions Before Payment’ the style that encompasses the Wordpress payment display is within the source of the pages themselves.
Agents (who resell your courses)
You have the option to either specify one agent that the plugin will book all registrations for - useful if you have agents with their own websites who wish their customers to place orders directly with you. Process rules can be dependent on whether an agent is specified or not. This means that Agents can be notified when bookings have been made, they can receive invoices or purchase orders for management of any commissions etc.
The other option is that agents can be validated at registration on your site via the plugin. This means that you can track those registrations from your customers.
Multi-booking (cart-like purchasing)
Customising the look and feel
For most Wordpress installations a standard theme that is included is twentyfifteen, using this case you can add customised javascript and css files to this directory:
/wordpress/wp-content/themes/twentyfifteen/coursesales/
The files need to be named:
coursesales-com-connector-public.js
coursesales-com-connector-public.css
The files need to be accessible by WP
We suggest that you start with the files that are in coursesales-com-connector/public/css and /js directories and and edit these - once added the files in the theme will be used instead of the files from the plugin.
Plugin Installation
The plugin is called ‘CourseSales.com connector’ installed from a zip file - you will need to activate it once it is added to WordPress. If you need assistance or guidance about installing plugins please consider this tutorial as a starting point.
-
Upload and install by either uploading the zip file, or ftp the entire
coursesales-com-connectordirectory to/wp-content/plugins/ -
Activate the plugin through the ‘Plugins’ menu in WordPress
-
Edit the plugin settings, in particular make sure you supply the URL for your instance of CourseSales.com, the username of the CourseSales.com web services user, and the password
-
Decide if you would like a summarised list of courses to show; if so add the WordPress slug [coursesales-course-list-summary] on a page or post
-
Decide where you would like a detailed list of courses to show, and add the WordPress slug [coursesales-course-list-detail] on a page or post
-
Decide where you would like any forms to show and add the WordPress slug [coursesales-form] on a page or post
-
Enter the FULL path to the page where forms will show into the plugin settings page in the field “Form page”
-
Decide where you would like users to be sent when they have successfully completed a form, and add the WordPress slug [coursesales-form-success] on a page or post
-
Enter the FULL path to the page where you would like users to be sent when they have successfully completed a form into the plugin settings page in the field “Form success page”
-
If you wish to customise the layout then copy the files from ‘/wp-content/plugins/coursesales-com-connector/theme/coursesales’ to ‘/wp-content/themes/YOURTHEME/coursesales/’ and modify to suit your needs, but do not change any of the file names. If the files are present these customised files will be used in preference to the standard files with the plugin.
-
If you wish to customised the CSS and JS files then copy them from here ‘/wp-content/plugins/coursesales-com-connector/public/’ to ‘/wp-content/themes/YOURTHEME/coursesales/’ including the respective directories of css and js and modify to suit your needs, but do not change any of the file names. If the files are present these customised files will be used in preference to the standard files with the plugin.
-
If you do not need to edit the JavaScript or CSS files then delete them, that way you will always use the latest versions packaged with the plugin.
Plugin Upgrades
We test our plugin in a sandard, wordpress installation. This means that you might have other plugins or themes or configurations that might not match our testing environment. We lightly recommend you test a plugin update within a staging/test environment before making them live. To read more about the efforts we go to trying to ensure that the plugins are error free and migrate with the least pain please read this blog post.
The following steps will help if you plan to upgrade by uploading a new plugin file.
-
Open the plugin Settings page
-
Open another tab on your browser and deactivate then delete the plugin (ensure that the Settings page is still open)
-
Upload and activate the new plugin file
-
Switch back to the plugin Settings page and save it.
-
You should have the new plugin with the old settings still setup, make additional changes as required to take advantage of any new functionality.
Compatibility and testing
We run standardised repeatable tests using Selenium, we are happy to supply our automated selenium scripts to you so that you can use them to do your own testing with your own wordpress site’s configuration.
This plugin requires PHP 5.6 or higher
Version 1.0.21 Tested with Wordpress 4.7.3, 4.6.1, 4.5.3, 3.9.1
Version 1.0.7 Tested with Wordpress 4.7.3, 4.6.1, 4.5.3, 3.9.1
Version 1.0.4 Tested with Wordpress 4.6.3
Version 1.0.2 Tested with Wordpress 4.6.3
Version 1.0.0 Tested with Wordpress 4.6.1
Troubleshooting
The most common problem is due to having the Soap username and password incorrect. If you are getting a message that there are 0 courses, but when you visit your public pages eg: https://<shortname>.coursesales.com/public/courses there are courses listed the likelihood is that your password is incorrect. Change it and see if this makes a difference (be aware if you are using the Soap Username/Password in other systems these will also need to be updated.
Step 1: Check your public pages
Check to see if your public pages work, if they do then your website at coursesales.com is correctly configured - and the issue lies with the Wordpress configuration.
Step 2: Enable and check logs
CourseSales.com logs
Open your CourseSales.com website ie: https://<shortname>.coursesales.com, then visit System>Logs, take the URL to the log page and add “?debug=90” to the end eg https://ccl.coursesales.com/log/index?debug=90
This will enable debug logging at level 90 for the duration of the session, alternatively once you have completed your analysis add “?debug=0” to stop debugging.
As you visit pages on wordpress you should see these requests creating entries in the log (refresh the log to see them). Use this to troubleshoot any issue you have.
Wordpress logs
Should you need to troubleshoot the plugin enable logging in the WP configuration page, and install a plugin that displays the log eg WP Log Viewer, supply us with the necessary log entries if you notice something not working as you expect.
The following lines can be added to wp-config.php to activate logging to the associated file debug.log
define('WP_DEBUG', true);
define('WP_DEBUG_LOG', true);
define('WP_DEBUG_DISPLAY', false);
Asking for help
When contacting us please be sure to let us know the versions of Wordpress and the CourseSales.com connector if you are having difficulty.
When logging a support call about the WordPress plugins please include the following information:
-
WordPress version
-
CourseSales connector plugin version
-
Slug being attempted to use, eg [coursesales-course-list-detail location=3455]
-
Wordpress pages that include each slug, ie [coursesales-course-list-detail], [coursesales-form], [coursesales-form-success], [coursesales-course-cart]
-
Log data from both coursesales.com and wordpress.