To override the core cascading style sheet (css) and javascript files on CourseSales.com public pages, trainer portal and student portal you can include the following when linking to those pages: &css=XXX.css then ask for the css to be uploaded (by a CourseSales.com staff member) to use.
Which files to edit
After editing the required files, send them to CourseSales.com staff for upload.
Before customisation
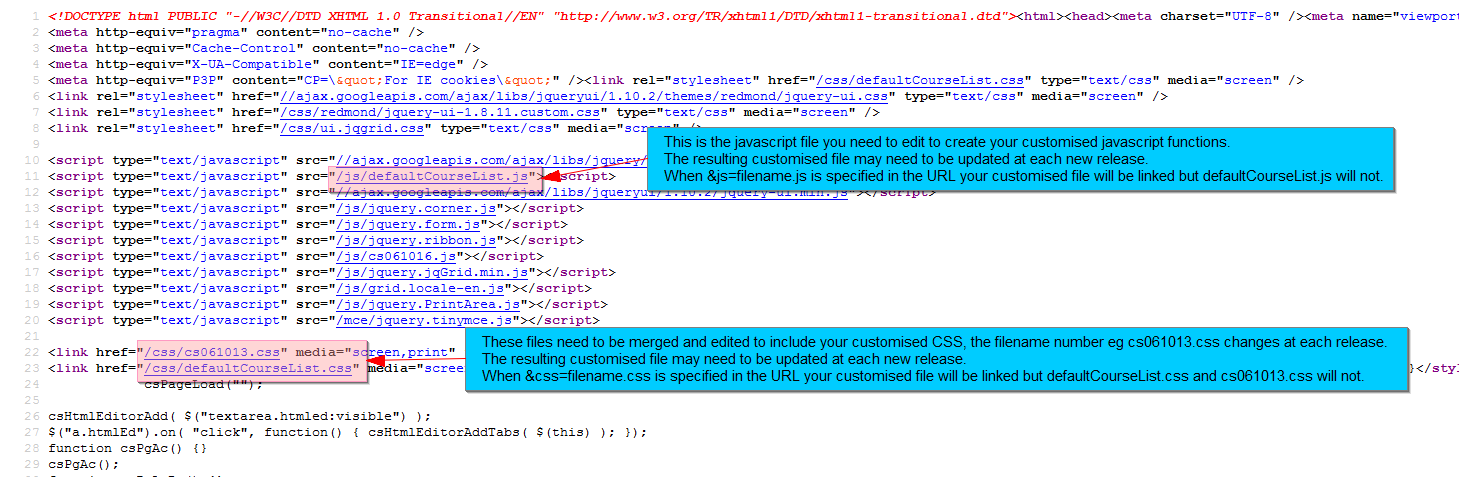
For the css there is either one file to use or two files that needs to be combined to introduce customisations. The files to use are as follows:
To find these files pre-pend with https://<shortname>coursesales.com |
Common Files (version ?v=6.93 changes per release) | Area specific files |
|---|---|---|
| Trainer Portal Javascript | ~ not required ~ | /js/portal.js |
| Trainer Portal Cascading Style Sheet | /css/csCom7000.css?v=6.93 | /css/portal.css |
| Public Pages Javascript | ~ not required ~ | /js/defaultCourseList.js |
| Public Pages Cascading Style Sheet | /css/csCom7000.css?v=6.93 | /css/defaultCourseList.css |
| Extranet Javascript | ~ not required ~ | js/defaultCourseList.js |
| Extranet Cascading Style Sheet | /css/csCom7000.css?v=6.93 | /css/defaultCourseList.css |
| Student Portal Javascript | ~ not required ~ | /js/portal.js |
| Student Portal Cascading Style Sheet | /css/csCom7000.css?v=6.93 | /css/portal.css |
to view the version and get a copy of the latest files view the sourceHTML of a public page:
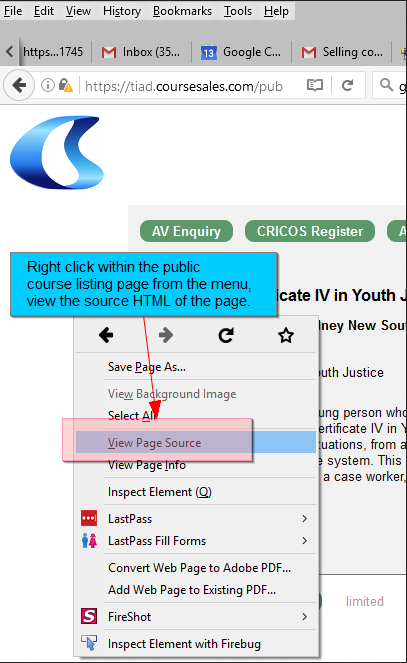
Then while viewing the source download the files:
After customisation
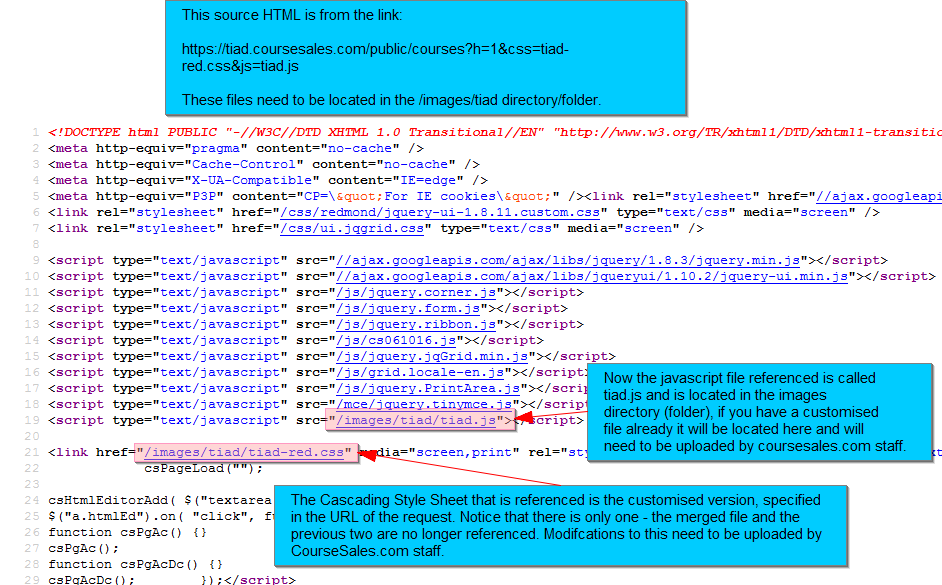
If the links already specify css and js files eg: https://tiad.coursesales.com/public/courses?h=1&css=tiad-red.css&js=tiad.js then your active files will be located here:
-
/images/[shortname]/[filename]
-
[shortname] is the name at the beginning of the URL, eg ‘tiad’ in the above example. [filename] is the name in the link, eg in the above example tiad-red.css)
-
The default files will not be included when a customised file is specified: defaultCourseList.css & cs061010.css
If specified in the link the javascript file will be located here:
-
/images/[shortname]/[filename]
-
[shortname] is the name at the beginning of the URL, eg ‘tiad’ in the above example. [filename] is the name in the link, eg in the above example tiad.js)
-
The default files will not be included when a customised file is specified: defaultCourseList.js
When customisation has been done you need to send to CourseSales.com staff to be uploaded:
Advice regarding customisation
Maintaining stylesheets and javascript files needs to be done manually. Stylesheets change each time we do a software release. These releases enable new functions or implement improvements rather than change existing styles. It is recommended that you distinguish between your code and the standard CourseSales.com css code to make transitioning to any new, updated code easier. In particular consider carefully the positioning of the new styles or code. We recommend putting your css code at the bottom of your css file and using the !important tag.
Positioning within your style sheet
If both pieces of CSS have the same specificity for example they’re both “body” then whichever gets called LAST will override the previous one.
BUT - if something has higher specificity (a more specific selector), it will be used regardless of the order. For example:
<div id="myDiv"></div>

/* CSS: */
#myDiv { background-color: blue; }
div { background-color: red; }
The above example will make the background color blue, even though blue was first because the id selector (#) is more “specific” than the general div element selector.
The inclusion of !important will override both specificity and order, it is recommended to use this to enable easy updating of the rest of the css.
Overwrite rules work the same on external CSS files. Just imagine putting them first-to-last, top-to-bottom. The selectors called in the first file(s) will get overwritten by same-specificity-selectors in any subsequent files. (hence the customised files are the last to load). But specificity will still trump order within the same file or in multiple files. For example: if you specify some code in the customised CSS file but then, in a form text field, specify different over-riding code it will be used instead.
We recommend you put your customised CSS at the bottom of the CSS file, this will ensure if your customised CSS code will be used.
How to test which css is being applied
In Chrome, Firefox, and modern versions of IE (probably Safari too), you can right click on something and click “Inspect Element”. This will show you the HTML as well as any applied CSS. As you scroll down the CSS (usually on the right), you’ll see things that are crossed out - that means they’re either incorrect CSS or have been overwritten. To test, you can modify the CSS selectors (either in your own code or right there in the developer tools box) to make them more specific and see if that makes then un-crossed out…etc. Play around w/ that tool - it’s VERY helpful.
The above advice has been modified slightly and was originally posted by Dave at the StackOverflow site.
Most browsers accept the commands Ctrl + F5 to refresh the javascript and CSS files. Do this to see your latest changes.
Other tips
Learn about CSS and how to turn on developer tools and inspect elements on your HTML page.
If you need to reset the specified style sheet then include the following in the link: &h=1&css=&js=
It is necessary to include &h=1, this code means having the HTML header and footer included, is the specifying of the css and js files amount other items. Without &h=1 there is no HTML header, so no styles or JavaScript will be applied.
Reviewing changes
Before going live, and before sending for upload it is helpful to review and preview your css changes (see below for examples) before they go live, and you potentially upset customers with strange changes to your look and feel of course listings, forms etc
It is helpful to review and preview your css changes (see below for examples) before they go live, and you potentially upset customers with strange changes to your look and feel of course listings, forms etc.
To do this we recommend you use the Stylish Addon for Firefox and Chrome, if you have questions about how to use stylish ask your questions in the Stylish Forms. There is also a brief tutorial to get you started.
An alternative to Stylish is Live Reload, for Mac and Windows (beta)
When you are happy with your changes send us your css file and it will be live.
Customising the cascading style sheets (css)
Here are some tips around using the CSS files, these could be useful if you are not a guru in modifying css files:
Trainer Portal
This removes the ‘summary’ information on the trainer portal. But shows the Given Name and Surname - to keep it tidy! Effectively allowing you to have full information within the document list, but limited items on the Registeration list from within the Trainer Portal.
.crsDocLstRowNameForm {
  display:none;
}
.crsDocLstRowNameGiven{
  display:initial !important;
  margin:3px;
}
.crsDocLstRowNameSurname{
  display:initial !important;
}
Course listing
To not display any header:
div#header {
  display:none !important;
}
Reduce the header space being used (above forms and list)
#header.public {
  height: 0px !important;
}
Curve edges of the course listing
body {
  border-radius: 10px;
}
Change colour of the course listing
div.crsRowEven {
  background-color:#F3F3F3 !important;
}
Add curves and colour to alternate rows
div.crsRowEven {
  background-color:#F3F3F3 !important;
  -moz-border-radius: 9px;
  border-radius: 9px;
}

div.crsRowOdd {
  -moz-border-radius: 9px;
  border-radius: 9px;
}
Change button colours
div.crsBtn {
  background-color: #262355 !important;
}
Make Course description ‘more’ button round with + inside
span.crsDscMore {
  width: 20px !important;
  -moz-border-radius: 9px;
  border-radius: 9px;
}
span.crsDscLess {
  width: 20px !important;
  -moz-border-radius: 9px;
  border-radius: 9px;
}
Change the page numbers to curves rather than rectangles
div.pgNumPrv {
  -moz-border-radius: 5px;
  border-radius: 5px;
}
div.pgNum {
  -moz-border-radius: 5px;
  border-radius: 5px;
}
Remove the display of catalog prices, eg to offer a discount without showing the price in the catalog item.
.prdLstPrc {
  visibility:hidden;
}
Remove the display of prices
div.crsPrC {
  visibility: hidden !important;
}
Reduce the width of the pages
 div#page {
   width: 890px !important;
 }
Modify look of course listings based on the course category
You may wish to display the listing for some courses differently. For example when selling an online course you may not wish to display the date (as the course is on-going). You can do this by referring to the Course Catalog Option Id in the CSS statement.
Remove the date from the course rows, with crsCatId=5361 (also known as OptionId), only:
.crsCatId5361.crsRow .crsDts {
   display:none !important;
}
You may also wish to modify the space left after removing this item due to the margin below the Course Category:
.crsCatId5361.crsRow .crsCat {
   margin: 12px 12px 0px 0px !important;
}
Other items that you could remove by replacing .crsDts:
| Code | What is represents |
|---|---|
| crsBtn | Buttons for documents |
| crsAvl | Course Available message |
| crsPrC | Course Price |
| crsCat | Course Category |
| crsDts | Course Date |
| crsLoc | Course Date location |
| crsVnu | Course Date venue |
| crsFmt | Course Format |
| crsDscSht | Course description short |
| crsDscLng | Course description long |
Forms
Hide the draft button
#page input[name="btnSave Draft"] {
  visibility: hidden !important;
}
or ( these work slightly differently )
input[name="btnSave Draft"]{
  display:none;
}
Then move the Save button to be center (rather than to the right of the form) if you choose to display none:
input[name="btnSave"]{
  left: 25% !important;
  margin-right: -75% !important;
}
Remove the back button
input[name="btnback"]{
  display:none;
}
Remove the back to list button (after submission of a form)
input[name="btnlist"]{
    display:none !important;
}
Remove the book another button (after submission of a form)
input[name="btnanother"]{
    display:none;
}
Remove the display of start and end dates and location (for online courses) - you may wish to create a different ‘online’ CSS file if you have online and face to face courses.
#divCourseDateStart {
   display:none !important;
}
#divCourseDateEnd {
   display:none !important;
}
#divCourseDateVenueId {
   display:none !important;
}
Remove the display of price on the booking form (to remove the price for just one form see below).
#divPriceCurrent {
   display:none !important;
}
Modify look of forms based on the form used
You may wish to display differently the enquiry forms vs registration form, or a registration form for corporate customers (private form) vs the public registrations (public form). You can do this by referring to the Form Id in the CSS statement.
Remove the price from the enquiry form (with FormId=2088) only
#page.FormId2088 #divPriceCurrent {
   display:none !important;
}
Payment methods
To hide the payment method ending a div with the Form id of 12925-368 (ie the payment method field + the id of the method)
div[id$="12925-368"] {
     display:none !important;
}
Another example, to change the colour (in this case a dark grey) of the text within multiple fields:
<style>
input[name$="9941"], input[name$="9889"] {
    color: #929191; !important;
}
</style>
Note that you could also use this to hide specific fields, targeting the field internal id rather than the full id of the form field means changes to the sequence (additional fields) nor different forms will effect the hiding action of the css. The field form ids are usually made up of a sequence id in addition to an internal form id.
Payment pages
To hide the back button
#back[id="back"]{
    display:none !important;
}
Extranet pages
To hide the ‘Courses’ drawer that has all the course information, useful when creating a password reset function, or wanting a cleaner form, you may only want to alter the content based on the form being completed - if this is the case it is necessary to refer to the css style ‘extranetFormXXXX’ where XXXX represents the id of the form.
The css code is as follows:
.extranetForm2871 .drwwdth {
   display:none !important;
}
If you want this to apply to ALL extranet forms then replace the following ‘.extranetForm2871’ with ‘.extranetForm’. You also have the option to change this based on (single or a combination) of: Course Category, eg. crsCatIdXXXX, Course Date Venue, eg. crsVnuIdXXXX, Course Location, eg. crsLocId6908). Read more about how to get an Id for an option like Course Category or Location. Note that this code below will not work if you have more boxes on the form see above for what to use in these cases. To do this as a combination eg, for the Course Category Id 1234 with the external form id 9876, use:
.extranetForm9876 .crsCatId1234 .drwwdth {
   display:none !important;
}
The external form will look like this before using the above CSS code

The external form will look like this after using the above CSS code

Using Javascript to change functionality
Javascript enables you to do things like change the words displayed on pages, add in content such as navigation tools and add new functionality. This functionality can be used on the public site or the internal site. For the pubic site you need to add your own scripts to the existing javascript file and specify your own file in the URL similar to how you specify your own CSS file. When using javascript on the administration portal you will need to include your javascript in the form text of the field on the form associated to the process step.
Review changes before going live
To add functionality to a page you an use small javascript functions, including jquery commands.
To review this functionality use the Firefox addon Greasemonkey, use this tutorial to learn the basics, if you have questions about how to use greasemonkey then read this information.
To enable a way to mark all units passed - in the admin portal
This will add a button within the admin portal that says ‘Pass All’ Once a unit is select that button will make the units of all courses passed.
 //the following adds a button to the bulk update page, and updates Topic outcomes from within the admin portal to ALL pass

   $("form[action='/documenttopic/bulkchangepost']").before("<input type='submit' name='btnPassAll' value='Pass All'>");
 //Update all outcomes to Pass

 $("input[name=btnPassAll]").on('click', function(){
 if (!$('select').hasClass("outcome")) {
   alert('You need to select and filter for a Course Topic (to the left) or add the class outcome to your outcome field on your document topics form');
 }
 $("select.outcome").val("20");
 });
To enable a way to mark all units passed - in the trainer portal
This will add a button within the trainer portal that says ‘Pass All’ Once a unit is select that button will make the units of all courses passed.
 //the following adds a button to the bulk update page, and updates Topic outcomes from within the trainer portal to ALL pass
 $(document).ready(function() {
   $("form[action='viewcoursedocumenttopicsdata']").after("<br><input type='submit' name='btnPassAll' value='Pass All'>");

      //Update all outcomes to Pass

 $("input[name=btnPassAll]").on('click', function(){
        if (!$('select').hasClass("outcome")) {
        alert('You need to select and filter for a Course Topic (to the left) or add the class outcome to your outcome field on your document topics form');
      }
 $("select.outcome").val("20");
 });
       });
To hide the form boxes by default when using the toggle feature
You might want to hide a box within a form (rather than show it). You can do this by using the following Javascript, within the form text on the form. It hides the box by default, and checks the checkbox used to toggle the box. It does not allow for a negative statement - only a positive statement “Invoice details are the same” not ‘I have different invoice details’. This can be pasted into the form text on the toggle checkbox. In this case invoice is the id of the form and Fld2089-23-10918 is the name of the field. Note that adding new fields to the form will BREAK this code, due to the name of the field changing. Remember if you have mandatory content within a hidden box the customer may be prompted to completed items marked in red, when in fact they can’t see any (as they are hidden).
<script type="text/javascript">
$(document).ready(function(){
  $('.fmSinvoice').hide();
  $("input[name=Fld2089-23-10918]").prop('checked', true);
});
</script>
Headers and footers
If you want sticky footers (that ‘stick’ to the bottom even when there is a small amount of content) visit these instructions: johannburkard.
To include image at the top of the pages:
#header.public {
    width: 100% !important;
    height: 141px !important;  /* Ensure this is the height of your image */
    background-position: center !important;
    padding-top: 0px !important;
    float:inherit;
    background-image:url('/images/[shortname]/header.png') !important; /* Replace [shortname] for your short name, and send us your header.png file to upload */
}
To replicate full HTML headers and footers including links and images of an existing site you will need to create customised CSS, JS, header.html and footer.html files.
Content for the CSS file, header.html and footer.html can be generated using the Google Chrome SnappySnippet tool that grabs HTML, CSS and JS code relevant to a selection.
When creating these files remember:
-
Check that the links are not relative but absolute (you want the links to go back to the original site, and src references to images to work)
-
To pre-pend all CSS IDs so that browsers can distinguish between header and footer CSS code.
-
You may need to adjust the CSS code to include background images/colours from the body of the HTML file.
-
Copy the relevant CSS code into the new CSS file
-
If you are on a secure page (such as a list of courses or form) and you include non-secure items in the footer. eg. images, errors/alerts may occur for the user.
-
Use the quick transfer to codepen.io to check that the HTML/CSS will work as expected.
Within the function
$(document).ready(function() {
  <insert code here>
});
Include the following code (which utilizes jQuery, and files you have supplied to CourseSales.com to upload to your image directory, eg footer.html & header.html):
  $("Div#headerRight").load("/images/[shortname]/header.html");
  $("Div#footerRight").load("/images/[shortname]/footer.html");
If you want to use different headers and footers on the list page, form page, form posted page and paid page then use code similar to this (note the inclusion of courseList, see below for further page specific ids to look for):
  $("Div#headerRight", '#courseList').load("/images/[shortname]/header.html");
  $("Div#footerRight", '#courseList').load("/images/[shortname]/footer.html");
Send CourseSales.com the CSS, JS, header.html and footer.html files to upload into your respective directory.
refer to the css file by including &css=[filename].css in the requesting URL
refer to the js file by including &js=[filename].js in the requesting URL
Replacing other tags without using a file
Using the following code in a customised javascript file you can customise content to replace existing css tags do this by using the following.
$( document ).ready(function() {
  $("div#headerRight").html( '[HTML]' ); /*Replace [HTML] with the html you wish to include */
});
Open a window for USI pages (or any new window!)
To open a new window for USI creation or USI forgot pages include the following code in the
Get that logo back
You will notice that when you choose to use a customised CSS file the logo in the top left hand side of the list and forms disappears. To get it back add this to your customised code (obviously you need to use your logo file name! ie /co/[shortname]/[shortname].png):
/* Show the logo again */
div#header.public {
  content:url(/co/ct/ct.png) !important;
  height: 90px !important;
  width: 180px !important;
}
Hide the course date information box completely
You could use CourseSales.com to gather information that is not related to a course, for example when you need to gather information from a inhouse course customer such as customisation needs, student numbers, invoicing details, venue information etc you can set up a course date for this purpose and direct those customers to fill out a form as if they were a student on that course, then populate your accounting system etc with that information. Because the actual course date, venue cost and dates are not relevant when gather this information the top information box is not useful. The following code hides it, just for that form that gathers this information (leaving all other courses including the course date information):
#page.FormId5378 #csCourseForm > div:nth-of-type(1) {
   display:none !important;
}

#page.FormId5378 #csCourseForm > div:nth-of-type(2) {
   display:none !important;
}
Before this css code is used:
After this css code is used:
Automatically selecting values
Where the value (not label) of the field is 8985 and the id of the field is 18859 from the id on the form of Fld3072-0-18859. Add to the form text - usually to the field where this is being added. This can be done using the default option within CourseSales.com however this might prove useful in occasions where this does not work as expected. By using the field id rather than the field id on the form means that adding or removing fields will not matter (as the form id for a field includes the field id and the sequence on the form).
<script>
$(function() {
    var temp="8985";
    $("[id$='18859']").val(temp);
});
</script>
Checking Payment methods automatically
In this case 7461 is the FieldId, and this code can be added to the form text of the field
<script type="text/javascript">
  $(document).ready(function(){
    $("input[name*='7461']").prop('checked', true);
  });
</script>
Working with Iframes
Paypal uses a same origin policy, so that using paypal within an iframe is not possible. For this reason you need to open a new browser window for the “pay using paypal” button. To do this include this in your javascript file (it basically adds an attribute called ‘action’ with the value ‘_blank’):
$('#documentFormPosted form').prop('target', '_blank');
No Record Found message
To customise the ‘no record found’ message that appears if no public courses can be found for the given criteria of location, course category etc.
$('div#MsgNoCourses').replaceWith("<font size=+2>We are working hard to try and get more of these courses listed.</font>");
Before using this css:

After using this css:

Show, by default, files listed
You need to automatically display the Section 1 text (rather than the short text of the description), and reverse the -/+ indicators of the default item listing. Add this to the javascript file within $(document).ready(function() { …};
$('span.crsDscMore').trigger('click');
$("span.crsDscLess").html( '+' );
$("span.crsDscMore").html( '-' );
Change content where no id nor name is present
But what is required is an HTML element surrounding the text to replace.
$( "h2:contains('No Record Found')" ).replaceWith("<font size=+2>We will list more of these of these courses soon.</font>");
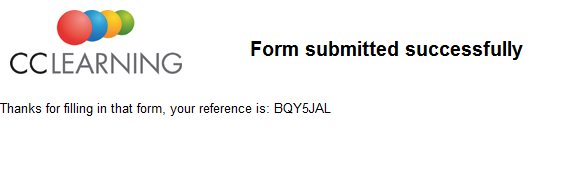
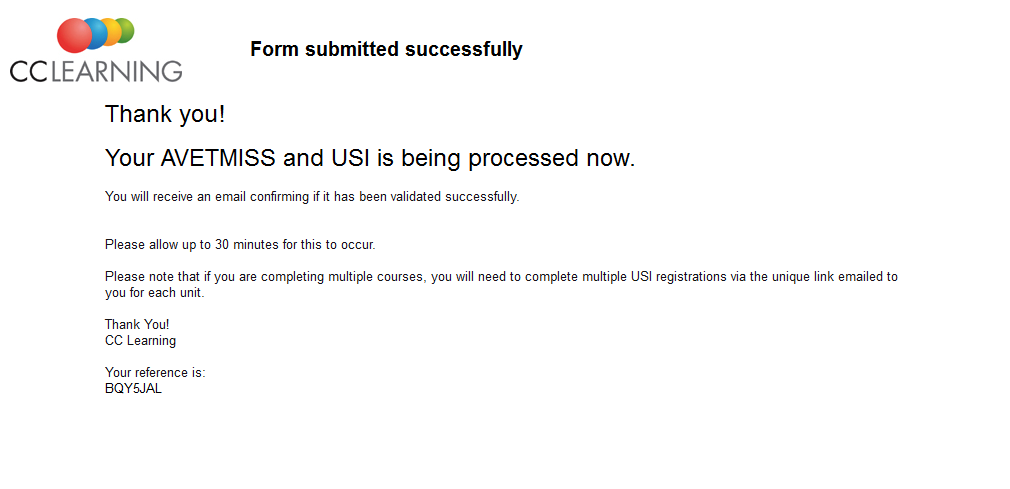
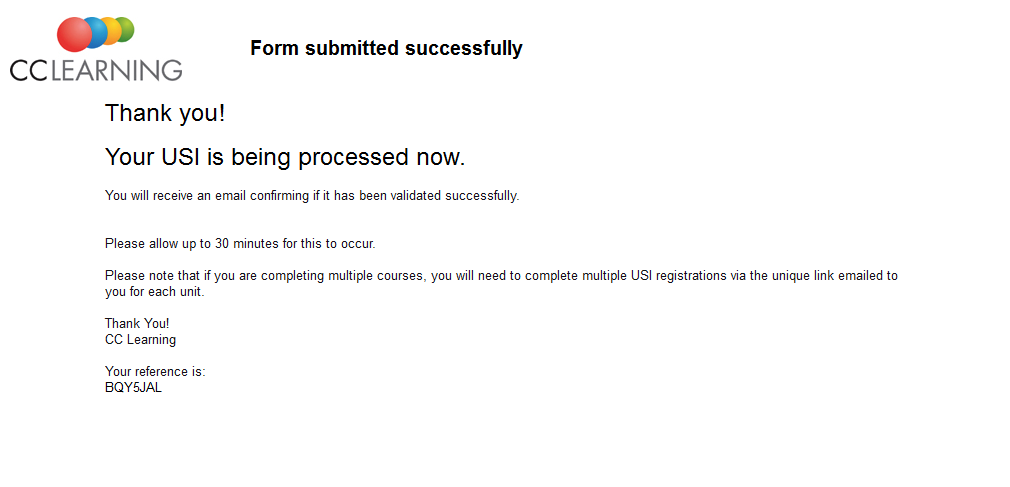
Customizing the document form Thank You messages
The standard thank you message is:
But if your form for student to submit AVETMISS (Australian regulatory data for RTOS) and USI (Unique Student Identifier) data, and you need the student to know that it might take a little while to confirm their USI then wouldn’t this message seen more sensible?
And then if the customer gets their name or USI incorrect and must submit these details again, which could be delaying the issuing of their certificate, it would be good to tell them:
This customisation is possible by using the following javascript (which needs to be customised for the forms on your site):
$(document).ready(function() {
  ...lots of other javascript code...
  $(".FormId1961 span#formSuccessMsgTxt").load("/images/[short name]/ThankYouAVETMISSSubmit.txt");
  $(".FormId2460 span#formSuccessMsgTxt").load("/images/[short name]/ThankYouUSISubmit.txt");
});
Where the following needs to be updated:
-
.FormId1961 - this is the form id for the form on the process path associated to the process step, to get this id either view the source of the thank you page or edit the form and click on the blue title bar.
-
[short name] - this is the short name in the URL of your link to CourseSales.com, eg: [short name] = ccl, in the link: https://ccl.coursesales.com
-
ThankYouAVETMISSSubmit.txt - this is the HTML you will to display instead of ‘Thanks for filling in that form, your reference is’, you need to email this file in HTML for us to upload for you.
You can have as many of these as you like, so a different message for each form that you use. You can also use the same method to have different messages for extranet forms. This Javascript needs to be added to your customised javascript - which also needs to be emailed to CourseSales.com staff to upload.
Link for Unique Student Identifier information windows
The following allows the links to find a forgotten USI or to create a USI to open in a small window on the screen.
The JS file:
initOnCompleteLoad();
   $('#JumpLinkUSICreate').on('click', function(){
    JumpLinkUSICreate();
   });
   $('#JumpLinkUSIForgot').on('click', function(){
    JumpLinkUSIForgot();
   });
});
And then
function JumpLinkUSICreate() {
  window.open('https://portal.usi.gov.au/student/Usi/Create/OnBehalfOf','_blank','height=400,menubar=no,status=no,scrollbars=yes,titlebar=yes,toolbar=no,width=400','');
}
function JumpLinkUSIForgot() {
  window.open('https://portal.usi.gov.au/student/Usi/Forgotten','_blank','height=400,menubar=no,status=no,scrollbars=yes,titlebar=yes,toolbar=no,width=400','');
}
The CSS file:
/*For any of the spans that are links */
span.JumpLink {
  cursor:pointer;
  color:blue;
  text-decoration:underline;
}
span.JumpLink:hover {
  text-decoration:none;
}
Show and Hide Terms, or any content
To hide some text just below a ‘Click to read more’ link eg Terms & Conditions or catalog item description include the following:
The content within CourseSales.com should look like this (view the source of the content/description):
<p>
  <a class="toggle-trigger">Click to read more..</a>
</p>
<div class="toggle-wrap">
  Enter content here...
</div>
In the CSS file:
/* hide content by default */
.toggle-wrap { display:none; }
The JS file should include:
$(document).ready(function() {
  $(".toggle-trigger").click(function() {
    $(this).parent().nextAll('.toggle-wrap').first().toggle('slow');
  });
});
Customizing the form response landing pages eg paid, records not found
Each of the following DIV encloses all the page content, you can set CSS rules based on these IDs read more about how to do this here
-
courseList (for the default listing of courses, ie xxx.coursesales.com/public/courses?h=1)
-
documentForm (for the display of a document form)
-
documentFormPosted (for the display of a landing page after the submission of a document form)
-
documentFormPaid (for the display of a landing page after payment)
Note that the following replaces the h2 element, you can read more about that here (incase you wish to replace another element on the page). This example means that once a registration is made, ie a document is submitted, the usual ‘Form submitted successfully’ heading is replaced with the content in the file ‘formcompletion.html’ to avoid the content being formatted as <h2> the <h2> element is also removed.
$( document ).ready(function() {
  $('h2.public','#documentFormPosted').load('/images/[shortname]/formcompletion.html', function() {
    $(this).children(':first').unwrap();
});
Similar to above you can use the “replaceWith” to remove the HTML tags (that often define the colour, size, font etc of the text).
Alternatively you can use “text” to just replace the text while maintaining the colour, size, font etc of the text).
Example using replaceWith: Replacing the Terms and Conditions phrase ‘I accept these terms’ with a phrase to your liking:
$( document ).ready(function() {
  $('div.csAcpTrm label','#documentForm').replaceWith("These terms are acceptable");
});
Example with text: Replacing the Terms and Conditions phrase ‘I accept these terms’ with a phrase to your liking:
$( document ).ready(function() {
  $('div.csAcpTrm label','#documentForm').text("These terms are acceptable");
});
Replacing the default HTML message ‘Paid’ upon successful online payment
$('h2.public','#documentFormPaid').load("/images/[shortname]/formpaid.html");
or
$('h2.public','#documentFormPaid').replaceWith("Thank you for your payment");
If you have a different website address or part of your website you could us the following to customise the message.
$( document ).ready(function() {
  //** Extranet thank you heading
  //Default: Thank you
  // You could also use getUrl .protocol + "//" + getUrl.host
  //Alternatively use replaceWith
  var getUrl = window.location;
  var whereURL1 = getUrl.pathname.split('/')[1];
  var whereURL2 = getUrl.pathname.split('/')[2];
  if (whereURL1 == 'extranet' && whereURL2 == 'thanks'){
    $('h2.public').text("You have completed your exam! We look forward to seeing you on the course.");
  };
});
Using variables in the URL to create meaningful error messages or display customised results
If you have this URL:
https://ttc.coursesales.com/public/form?CourseDateId=32111&ProcessStepID...
Use this code:
function getUrlVars() {
  var vars = {};
  var parts = window.location.href.replace(/[?&]+([^=&]+)=([^&]*)/gi, function(m,key,value) {
    vars[key] = value;
  });
  return vars;
}
To then use this to source the variables in the URL:
var first = getUrlVars()["CourseDateId"];
var second = getUrlVars()["ProcessStepID"];
Create complex calculations on a form, documents or process steps
The following is code that creates a form to calculate the values to enter into a PDF invoice to send to customers. This allows you to invoice customers for a number of students on a per student price, but allows allows you to manually adjust these figures if the format of invoicing changes, to for example a fixed fee or tiered fee structure, by allowing you to enter the fixed before tax, tax and including tax values along with a description that will be printed on the invoice. The process step form that calculates and send this email/PDF invoice is on the Document process path, the code is copied into the first field’s field text. Be sure to close all your HTML tags, not doing this could cause issues with the rest of the page, ie even not closing a <b> tag with </b> can cause problems - if you have strange things happen like other process step forms not appearing when selected take a look at the HTML in the field text on the form.
<script type="text/javascript">
  $(document).ready(function(){
    $("input[name=Fld2151-1-11203]").keyup(function(){
      var val1 = parseInt(document.getElementsByName("Fld2151-0-11202").item(0).value);
      var val2 = parseInt(document.getElementsByName("Fld2151-1-11203").item(0).value);
      $("input[name=Fld2151-2-10668]").val(precise_round((val1*val2),2));
      $("input[name=Fld2151-4-10667]").val(precise_round((val1*val2*0.2),2));
      $("input[name=Fld2151-6-10666]").val(precise_round((val1*val2*1.2),2));
    });
  });

  function precise_round(num, decimals) {
    var t=Math.pow(10, decimals);
    return (Math.round((num * t) + (decimals>0?1:0)*(Math.sign(num) * (10 / Math.pow(100, decimals)))) / t).toFixed(decimals);
  };
</script>
In addition to the notes field there are 5 ‘data’ fields on the process step form:
| Field Name | Description | Calculated | |
|---|---|---|---|
| A | Fld2151-0-11202 | Number of students | entered |
| B | Fld2151-1-11203 | Amount per student (excl. tax) | entered |
| C | Fld2151-2-10668 | Total (excl. tax) | =A*B |
| D | Fld2151-4-10667 | Tax amount (20% in this case) | =(A*B)*0.2 |
| E | Fld2151-6-10666 | Total (incl. tax) | =(A*B)*1.2 |
The form, once formatted to include instructions, content fields, and the above 5 fields with no labels appears like this:
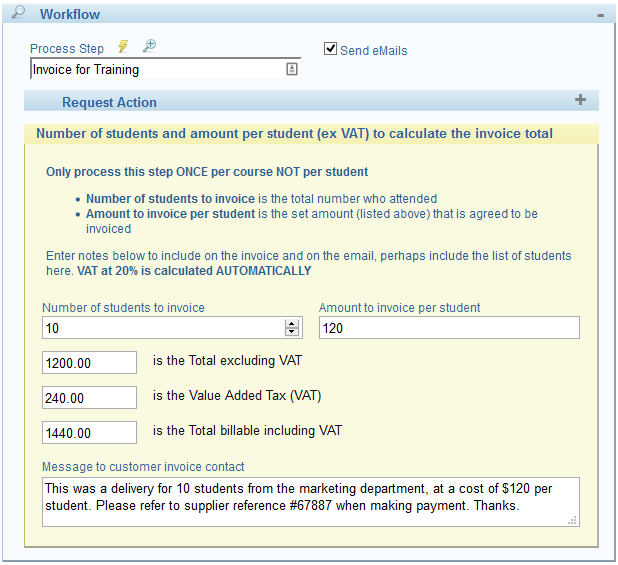
In the background of this configuration there is a role called ‘customer contact’, a PDF that uses these fields to create an invoice, and an email that the PDF is attached to, sent to the customer contact as the individual is linked to the course date/course master.
Troubleshooting
If your tags in the js file are having no effect on the text check that &h=1 is included in the URL - otherwise the headers that include the custom js files will not appear.