You an create certificates, or testamur, by creating a content of the type ‘PDF’ you have access to variables and can incorporate images for signatures etc.
-
Print certificates generated from process steps
-
PDF Certificates can be emailed
-
External reference number allows referencing back to training organisation database
-
Incorporating QR codes
When testing that your PDF certificates look as you expect, rather than sending lots of emails you might want to know How do I download a PDF generated from a PDF template?
Australian RTO requirements
If you are an Australian RTO you might be interested in the following requirements defined by the ASQA:
2.1.6 Sufficient information must be provided on a testamur, record of results and graduation statement to ensure that the documentation is able to be authenticated and to reduce fraudulent use.
The testamur will contain sufficient information to identify correctly the:
issuing organisation
graduate who is entitled to receive the AQF qualification
awarded AQF qualification by its full title
date of issue/award/conferral
person(s) in the organisation authorised to issue the documentation, and
authenticity of the document, in a form to reduce fraud such as the issuing organisation’s seal, corporate identifier or unique watermark.
Here is an example supplied by ASQA for a testamur, record of results and statement of attainment.
Here is an example supplied by AQF for a testamur, record of results and statement of attainment.
Is is important that you follow the guidelines provided by the governing body read more here
To include a title of the course on your certificates that is different to the course category use the course description content, eg Section 2 content, and describe the certification for completing the course. For each course you deliver you may wish to adjust the number of new lines before and/or after to ensure that, after trial and error, your certificates will fill the entire A4 PDF.
Nationally Recognized Training Logo
As an RTO you may also be eligable to include the Nationally Recognized Training Logo.
The NRT logo is used to promote and certify national vocational education and training leading to AQF qualifications or statements of attainment. All RTOs must comply with the Standards for Registered Training Organisations 2015, Schedule 4 when using the NRT logo. Find out the conditions of using the NRT to logo in the NRT logo specifications. Request a copy of the NRT logo by emailing enquiries@asqa.gov.au.
Including Units of Competency on a statement of attainment
To ensure the correct Units of Competency appear in any statement of attainment it is necessary to mark those units as ‘Competency Achieved/Pass’, ‘Recognition of prior learning granted’ or ‘Credit transfer/national recognition’ any of the alternative outcomes will mean the unit will NOT be included in the respective list:
-
Competency achieved/pass YES
-
Competency not achieved/fail
-
Withdrawn/discontinued
-
Incomplete due to RTO closure
-
Recognition of prior learning granted YES
-
Recognition of prior learning not granted
-
Credit transfer/national recognition YES
-
Continuing activity
-
Non-assessable activity – satisfactorily completed
-
Non-assessable activity – withdrawn or not satisfactorily completed
-
Not yet started
-
Not yet available
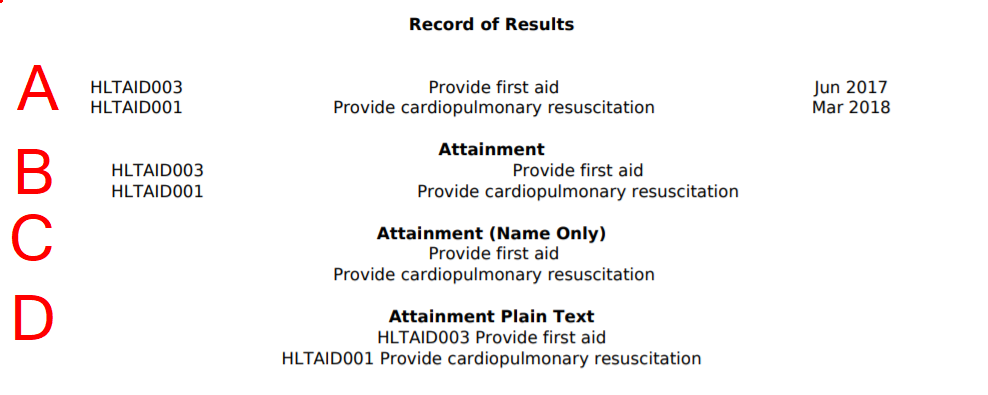
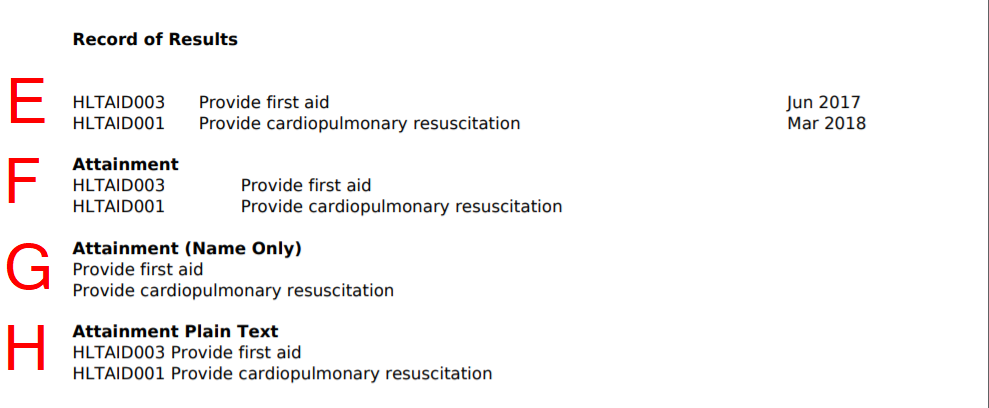
The following short codes can be used in emails and PDFs that display the Units of Competency for the purposes of creating a certificate or list of units:
| Name of Short Code | Short Code | Characteristics |
|---|---|---|
| Record of Results | [DocumentTopics:RecordOfResults] | A, E Includes Unit Code, Unit Name and month of award completion, in a three column 100% width table best used as ‘non-centered’ content |
| Attainment | [DocumentTopics:Attainment] | B, F Includes Unit Code and Unit Name, in a two column 80% width table best used as ‘non-centered’ content |
| Attainment (Name Only) | [DocumentTopics:AttainmentNameOnly] | C, G Includes Unit Name, in a one column 100% width table best used as ‘centered’ or ‘non-centered’ content |
| Attainment Plain Text | [DocumentTopics:AttainmentDiv] | D, H Includes Unit Code and Unit Name, within an HTML div best used as ‘centered’ content |
Here are examples of these being used in a PDF when centered
This content:
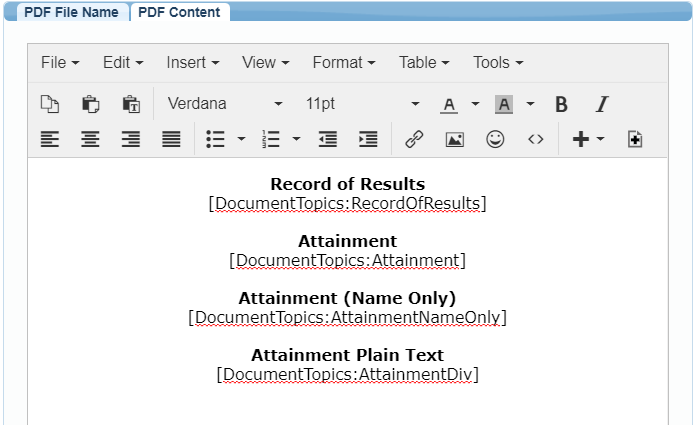
Displays this content in a PDF:
Here are examples of these being used in a PDF when uncentered
This content:
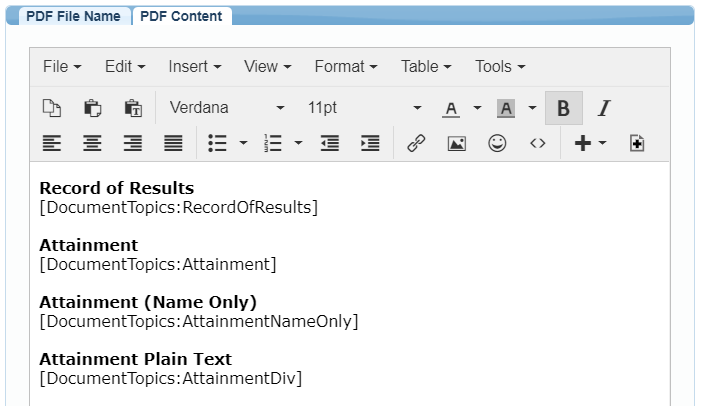
Displays this content in a PDF:
How to include the Qualification name on the certificate (while continuing to use just one PDF template)
One way to specify the qualification/Program name on a certificate is to use one of the the Course Description content sections. This has the advantage of changing what should appear on a per course date basis, so if you deliver a standard course that varies from the standard you can specify it. To edit a PDF certificate visit Publish>Content (filter by course descriptions) and edit the section that includes the content you want to modify. This can then be included in the certificate by referring to the appropriate content using the correct short-code.
Tips when designing your certificates
-
Remember that you have little control over the size of the student name, for this reason consider longer names and short names, otherwise the formatting might not work for long names. Ways to make longer names work: put each name on a new line, use small fonts.
-
Put common text into a background image, rather than on the page - try to make this common text appear at the bottom and top, rather than the middle, which can cause problems if trying to avoid text like names from appearing on top of the background image text.
-
Use a high resolution background image to ensure any text does not appear blocky.
-
Avoid an image greater than 2Mb as this may make the PDF large and tricky to download for students.
-
Use course description content sections to include customised content, and perhaps customise this per course.
-
Test each course and a variety of names to see the possible outcomes.
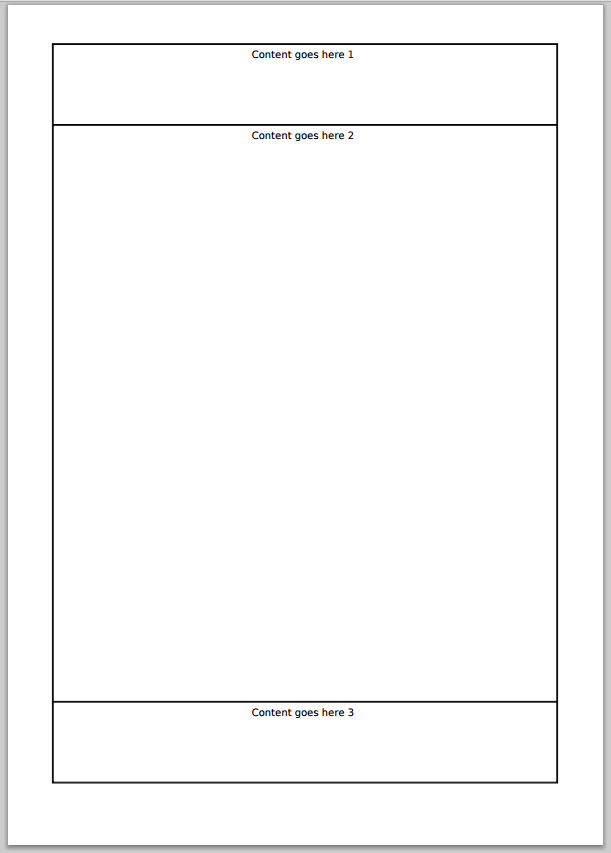
An A4 page is approximately 920px in height, we can use this to specify the height of a page, then include headers and footers as table rows:
<table width="100%" border="1" cellspacing="1" cellpadding="5">
<tbody>
<tr>
<td style="height: 100px; text-align: center;" width="100%">Content goes here2</td>
</tr>
<tr>
<td style="height: 720px; text-align: center;" width="100%">Content goes here2</td>
</tr>
<tr>
<td style="height: 100px; text-align: center;" width="100%">Content goes here3</td>
</tr>
</tbody>
</table>
PDF result:
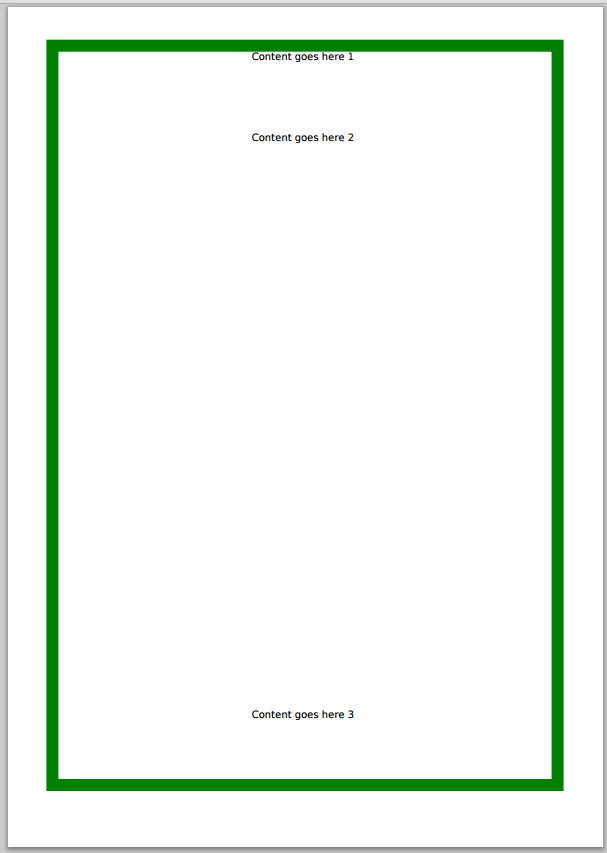
To add a border just specify a border width and colour eg: style=“border: 15px solid #008000;”
<table style="border: 15px solid #008000;" width="100%" cellspacing="1" cellpadding="5">
<tbody>
<tr>
<td style="height: 100px; text-align: center;" width="100%">Content goes here 1</td>
</tr>
<tr>
<td style="height: 720px; text-align: center;" width="100%">Content goes here 2</td>
</tr>
<tr>
<td style="height: 100px; text-align: center;" width="100%">Content goes here 3</td>
</tr>
</tbody>
</table>
PDF result:
Background Images
If you wish to include ‘watermarks’ or background images on your certificates you can do this by sending us the file you want to use in the background and we can upload it for you.
-
You will need the Internal Content Id of your PDF template, you can get this in the same way that you get your Option IDs
-
Create your preferred image and name the file ContentId.png, eg if the Content with the PDF is # 234, the file should be named 234.png
-
The image will be scaled to fit an A4 page and will cover the whole background.
-
Send your CourseSales.com staff the image
-
We will upload the background image to the normal image location on the server /
<shortname>/pdf/, eg /ccl/pdf/
Some point to note when thinking about your background image
-
The image is stretched to fit the A4 page, this means that square images like this draft notice will be stretched to look like this across every page. See this example.
-
If you have tables on the page that have background colours or images then these will be on top of the background image so will cover it. See this example.
-
If you have images on the page these will be on top of the image and may be noticable if they don’t have transparent backgrounds if they do you can layer images one on top of another. See this example.
-
Only PNG supported as a background image.
-
Equivalent A4 paper dimensions in pixels at 300 DPI are: 2480 pixels x 3508 pixels (print resolution)
-
While you don’t need to get the dimensions exactly right (the image will be stretched), if you get the proportions correct you will see an improvement to the display of the image.
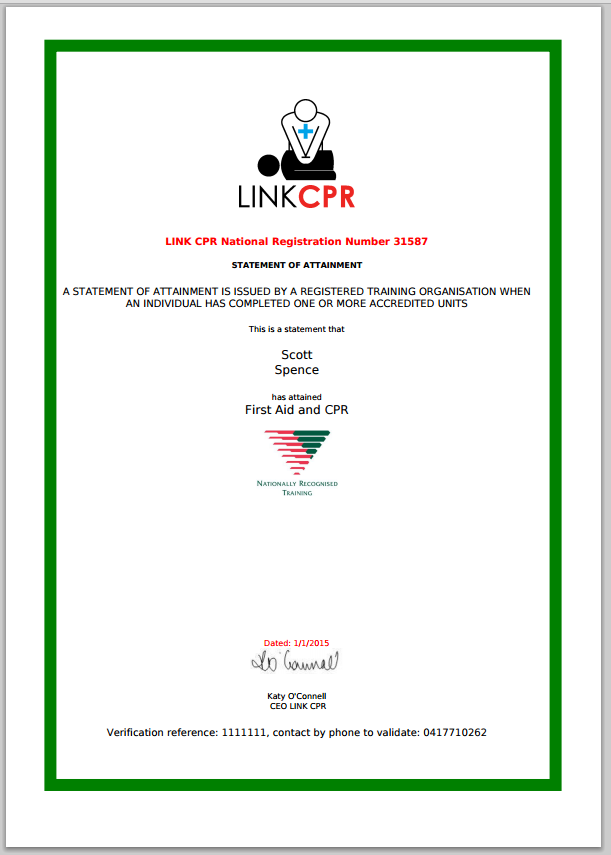
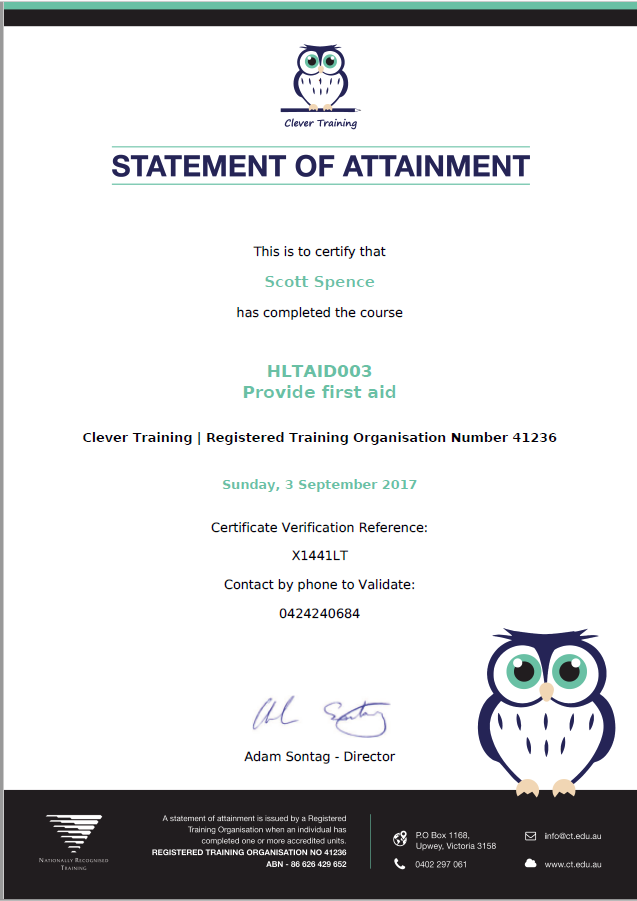
Examples of certificates
Example without use of background image:
Example when using a background image:
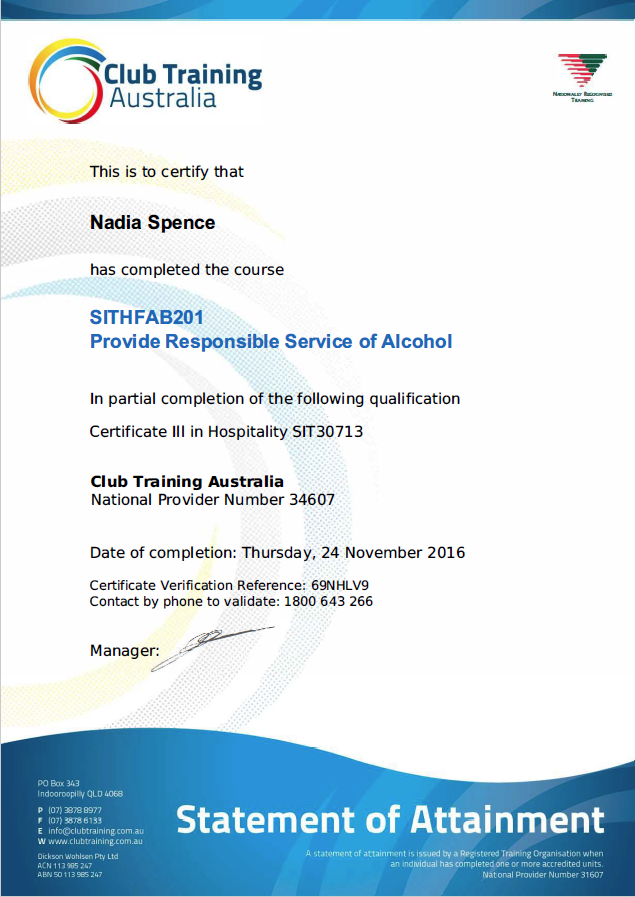
Sample of Clever Training’s certificate design
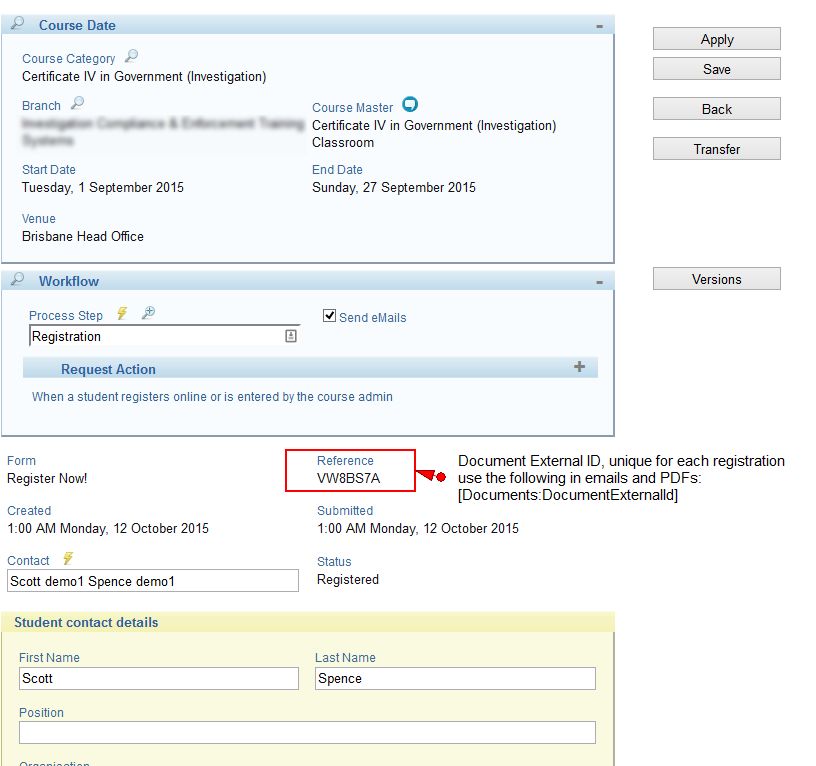
Where do you find the external reference number?
We recommend you put it on each email that gets sent to the student, and on the PDF certificate, the field reference to use in emails/PDFs is [Documents:DocumentExternalId] you can locate it here:
What dates can I use in certificates?
Depending on your needs you might be interested in the following guidance on dates available for use in PDFs (certificates) and emails: Dates as variables in Exports, PDF and Email